Friday, December 30, 2011
How To Fix The Windows Problem Of Ejecting The USB Device
However, sometime we may encounter a problem where the Windows unable to eject the USB device because there is still application or process running with the device. I am the one who facing this problem many time and normally I just unplug it to force disconnection. I can’t catch the process from the Windows task manager because I don’t know which process can be terminated.
Luckily I found a useful tool and I won’t need to worry this problem anymore, because it can help me determine the active process and unlock it so that I can remove the device safety.
Download the tool here Unlocker.
1. Select the the USB device that you can’t remove and then right click it to select “unlocker” from the options.
2. After the unlocker page apprear, select the “unlock all” button to unlock the process..
3. If the device still attaching to some active process then you need to select the “kill all” button to solve it.
Wednesday, December 21, 2011
How To Remove All The DotNet Framework Version From Windows Machine
Especially when you try to uninstall the application that the installer no longer available in your list.
Here got 1 useful tool that allow you to uninstall all the version of DotNet Framework without worrying the available of the installer.
DotNet Framework Remover Tool
Sunday, August 22, 2010
How To Replace Spark Plug Wires
- Do the checking at night or wait until it is dark outside.
- Start the car engine and then open the hood and remove the wires slowly.
- When removing the plug wires from the cylinder you must check carefully and look around the wires, if the wires light up meaning the wires are bad.
* If the wires in good condition, they won’t light up when the cable surface close to the engine. Only the head of the wires will light up because it connected to the plugs.
http://www.youtube.com/watch?v=RxiGBODq7Bk
Steps to replace spark plug cable
- Turn off the engine.
- Open the new plug cables and see whether are they label with 1, 2 , 3 and 4, if the new cables aren’t then lay them down and label them by the length of wires.
- Remove and replace the cable one by one. Do not think to unplug all at the same time unless you mark it with number.
- When removing cable from the distributor cap, remember to loose the gap first and not to remove by force. - Normally the manufacturer will deliver together with a plastic slot that use to hold the cable so that they don’t rub against each other or touch on any art of the engine.
Tips:
1. You can replace only those broken wires, but I prefer to replace 1 set (4 wires).
2. Don’t think to save cost and replace the low quality of spark plug wires, because it doesn’t worth and may be pay more in future for the maintenance.
Tuesday, June 8, 2010
How To Record Object On The Popup Window In QTP 10
Are you having problem of capturing the objects that appear on the popup window in QTP?
This problem occurs is due to the IE problem, the QTP 10 is not able to record the popup window objects if you are using IE7 or IE8, however the objects can be recorded in IE6. After I trying to record for some popup window, I discover that QTP still not able to fully recording the objects on the popup window but it is much better than IE7 or IE8.
To increase the possibility of success in the object capturing, you need to reset the event capturing level from basic to high level.
Tools - Web Event Recording Confirguration
.
After capturing is done, then you need to do some filtering steps to filter off the unnecessary scripts that recorded. This is because you reset to high event level, therefore whatever actions perform during the recording will be recorded.
Friday, May 21, 2010
Resolved Window Live Messenger Invitation Alert Message

I guess it may be a defect for live messenger where it can’t synchronize to the server retrieving the status. Finally I got the solution to make this alert disappear.
- Sign Out and exit the messenger and then enable the “Show hidden files and folders” in the folder option.
- Go to “C:\Documents and Settings\[users]\Local Settings\Application Data\Microsoft\Windows Live Contacts".
- Delete all the folders and Sign In, the alert message is no longer displaying on the page.
Monday, May 17, 2010
How To Stop IIS Server
Here are the basic command that use for the IIS server
Stop IIS : iisreset /stop
Start IIS : iisreset /start
Reset IIS : iisreset
QTP 10 Menu Options Have Disappeared !
I don't aware what i have configured the setting to cause the menu options suddenly disappear. It just happened after the license key successfully validated. At first i guess it may due to the add-in not being licensed therefore i reboot the QTP and i noticed that the add-ins are licensed. I suspect it may due to the setting then i try to figure out the problem.
Finnaly i find the way to fix it, Just restore it to default.
1. Start QTP and open the main page after licenses key validation.
2. Move mouse pointer to the menu pane and right click then select Customize Option.

3. On the popup window select toolbar tab then click on the Restore All button.

Monday, April 26, 2010
How To Enable The Control Toolbox In Office Word 2007?
This function is not enabled by default and you have to turn it on only can use. Here is the way of how to enable the function.
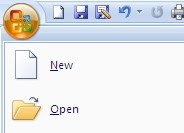
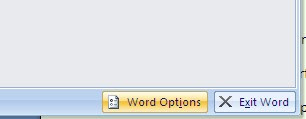
1. Go to Microsoft Office button and select Word Option on the bottom follow by highlighting Popular option.


2. Checked the box for Show Developer tab and then exit.

3. From the main interface you will see the Developer tab enabled.
4. Click on the Developer tab, select Control Group and click the Legacy Tools.

5. Under the Legacy Form, you can choose which ControlBox you like to add.
Note: If the toolbox added has a gray background, you can click the Form Field Shading under Legacy Form to remove the background color.

Monday, March 15, 2010
How To Remove Excel 2007 Add-In
Recently it happen to me where the add-in install to the Excel 2007 is not automatic uninstall together with its parent application. Hence, when every time I run open Excel the error message is shown to me indicate that there is incorrect path for the add-in.
To solve this you need to manually remove the add-in.
1. Open the Excel option page. (Excel Icon – Excel Option button at the bottom)
2. On the Excel option page, select Add-Ins from the left pane and then look for the add-in that causes an error.
Eg: If the add-in type is “Excel Add-Ins”, then select the add-in type in the Manage drop down and click Go button.
3. On the popup window uncheck the Add-In you want to remove and click OK. (If that add-in is invalid, the add-in will automatically remove. However, if valid add-in Excel just disable it and you can enable it back anytime in future).
Sunday, March 14, 2010
Turn Off Annoying PC Beep Sound
Did you ever hear the sound “beep” in the office? This is because the computer running or executing the application with error.
This is more happened for those running in virtual machine, because in physical machine we have installed sound card and driver therefore the machine will not trigger the beep sound. However, in virtual machine in order to get high performance and normally will not include sound device and therefore beep sound will be triggered if error occur.
You can follow these steps to disable it in Vmware
- Right click [My Computer] and then select [Manage].
- Under [Computer Management] select [Device Manager] to highlight it.
- From the Menu bar select [View] then click [Show Hidden Devices]
- Expand the Menu for [Non-plug and play drivers]
- Double click on the [Beep] item and go to [Driver] tab and click [Stop].
Saturday, March 13, 2010
Recreate Desktop Shortcut Icon To Quick Launch Bar
You can follow this step below to re-create the icon for Windows XP.
Step 1
Copy and paste this code to the noteopad
[Shell]
Command=2
IconFile=explorer.exe,3
[Taskbar]
Command=ToggleDesktop
Step 2
Select save as to save the file and name it as [Show Desktop.scf]
Take note the file must save in .scf
Step 3
Cut the file to below path
C:\Documents and Settings\Username\Application Data\Microsoft\Internet Explorer\Quick Launch
* Username = the name that currently logon to the Window
Friday, March 12, 2010
How To Send Large Attachment Via Email
There are some mail provider can help you solving this problem. They act as a file server and allow you to upload whatever attachment to the server and then send a notification email on behalf of you to the recipients with a download link to download the attachment.
This is very convenient and the link only available for the person you invited has the link to download the attachment.
Here are the two providers I use to send large attachment.
YouSendIt
TooBigForEmail


